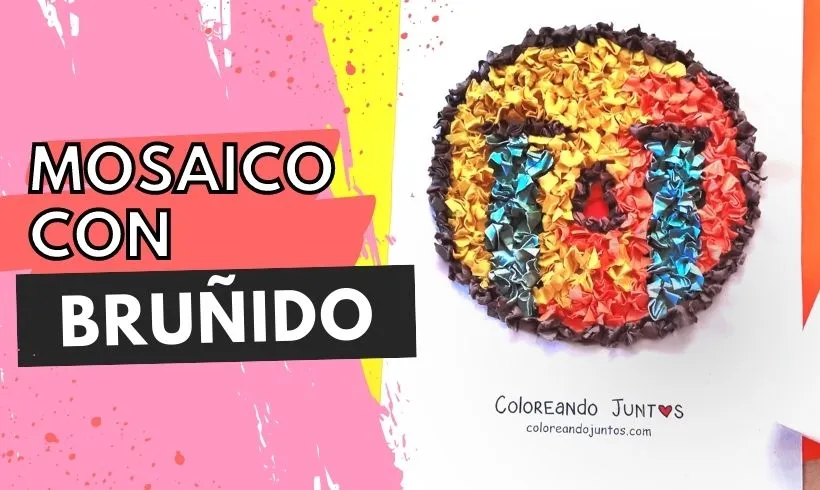
Paper Burnishing: Features and Tricks for Applying It
The time has come to have fun with the littlest ones at home by doing a super entertaining and creative activity. We are going to paint at Coloring Together using paper. Any idea what technique we are about to use?
It is the paper burnishing technique for coloring. Doesn't it sound like an easy technique to apply? Because it is. All you need is colored paper and white glue. Ready to get started?
What is paper burnishing?
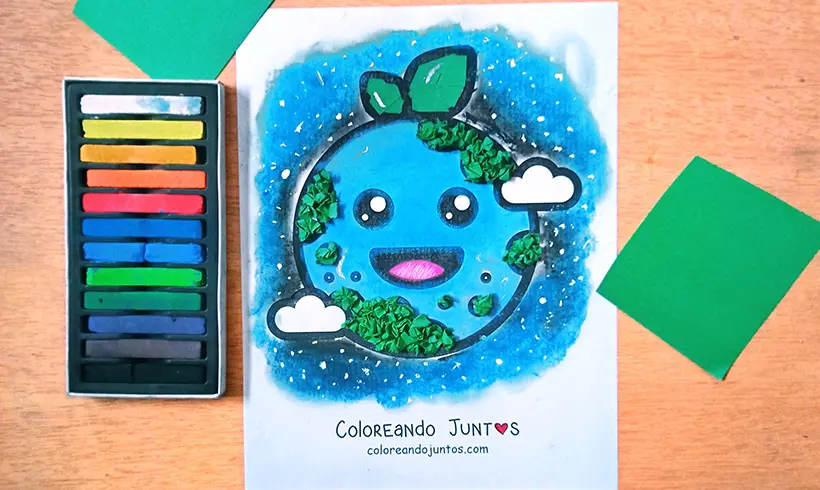
Paper burnishing is an artistic technique that involves using crepe paper, tissue paper, or other kinds of decorative and colored paper to make little balls and then use them to make a mosaic.
To apply it you must cut or tear the paper and form little balls with your thumb, index, and middle finger. Once the little balls are ready, you proceed to glue them onto a printed drawing until the paper is completely filled in.
Usually paper of different colors is used; however, if you only have white, then not all is lost. In fact, making white little balls can give you unique results, since you could use paints to color over the paper.
At what age can you paint with the paper burnishing technique?
The paper burnishing technique is known for being one of the most used in primary schools. It is one of the essential ones for the littlest ones, because it develops their motor skills by having them form little balls with the paper.
However, this technique is not limited to children. Like any artistic technique, anyone, no matter their age, can apply it. What matters when painting with the paper burnishing technique is that you want to learn and push the limits of your abilities.
How to apply the paper burnishing technique?
The time has come for us to teach you how to apply the paper burnishing technique to color all the drawings you print at Coloring Together. Are you excited to begin?
Step 1: Cut pieces of paper
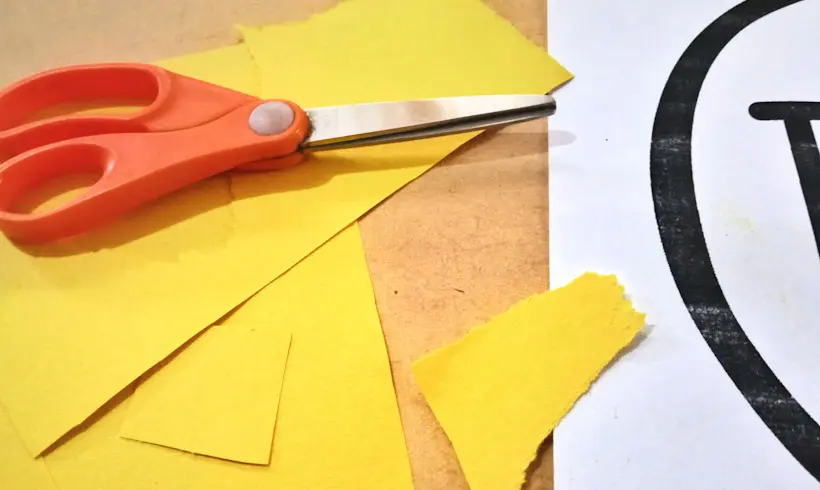
Take the paper you have chosen, it doesn't matter if it's construction paper, tissue paper, or crepe paper. With scissors, cut out squares or rectangles. You will use these later. They don't have to be perfect cuts, or those specific shapes. Do you like triangles? Cut out triangles!
Step 2: Make little paper balls

Once you have the little paper squares, use your thumb, index, and middle finger to make little paper balls. It doesn't matter if they are different sizes, you just need to make sure they come out ball-shaped and not flat. Give it a try!
Step 3: Start gluing the little balls
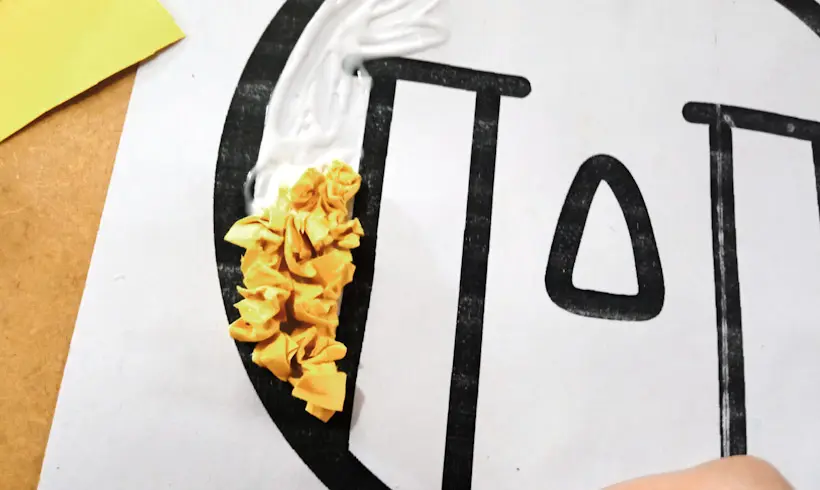
Apply white glue along the outline of your drawing with a brush, and then start gluing the little balls onto it one by one, always following the outline. Try not to go outside the lines! It's not complicated at all, you'll see.
Step 4: Combine your art with other colors and techniques

Although it may not seem like it, burnishing with colors is a technique you can combine with other materials, techniques, and colors to make your drawing turn out even better. Don't be afraid to try it! In this case we used an orange color to combine and give more shading to the sad little face. Do you like it? Give it a try!
Examples of Paper Burnishing applied
Techniques for applying Paper Burnishing
Don't think we're done. We still have a ton of things to teach you, and among them are the techniques you can combine with paper burnishing. Can you guess any? Because we are very excited to know what technique you come up with, besides the ones we will mention to you.
- Shading: To shade with paper you just need to choose a color or a tone very close to the one you chose as your base, but darker. That way, when your drawing is seen from afar, you can get the visual effect of depth.
- Multicolor: Who said you couldn't use lots of colors for this technique? Choose all the ones you want! The brightest and most eye-catching ones, and you'll see how your drawing comes to life.
- Finger painting: If you make white little balls, you have more freedom when it comes to colors, because you could use paints or tempera and paint with your fingers to reach the deepest and smallest areas.
Tricks and tips for applying the Paper Burnishing technique
We're almost done, but before you go we want to teach you a few last little things. Let's go! We'll give you all the tricks and tips for applying the paper burnishing technique.
- Use white glue instead of a glue stick to glue your paper, because glue sticks usually aren't strong enough to stick little paper balls.
- Use a brush to spread the white glue, this way you'll prevent lumps or wrinkles from forming on your sheet. By doing this you save glue while making the most of it.
- It's not necessary for all the little balls to be the same size, but if they all stay similar in size, then your drawing will be more uniform and look much better. Give it a try!
- Shade your drawings whenever you can. To do it you just need to choose paper with a tone similar to the base color but darker. This way you can shade with paper without much effort.
For now that's all we have to teach you. Surely you're taking home plenty of things to practice. Don't worry! Rome wasn't built in a day, everything is the result of effort, discipline, and consistency. Give it a try and you'll see that you'll make it!